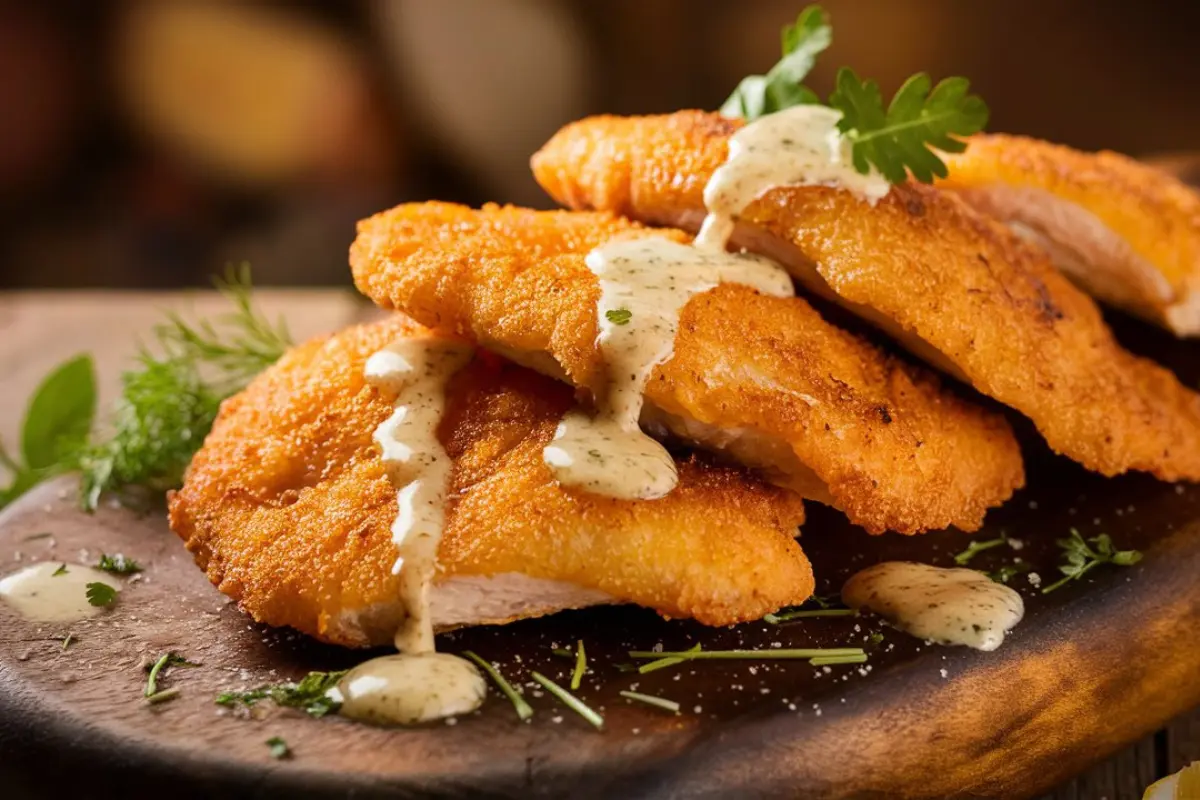
Let’s begin by exploring the magic of chicken cutlets. These thin, breaded slices of chicken are a culinary blank canvas waiting to be transformed into a delicious masterpiece. They can be enjoyed on their own, nestled in a warm bun for a satisfying sandwich, or even incorporated into a delightful salad.
The beauty of chicken cutlets lies in their simplicity. With just a few key ingredients and techniques, you can create a dish that’s both impressive and incredibly versatile. Whether you’re a seasoned cook or just starting your culinary journey, this guide will empower you to achieve crispy perfection with your chicken cutlets.
Throughout this article, we’ll provide step-by-step instructions, helpful tips, and troubleshooting advice to ensure your success. We’ll also explore different flavor variations to cater to every palate. So, get ready to elevate your chicken cutlet game and create dishes that will become family favorites!
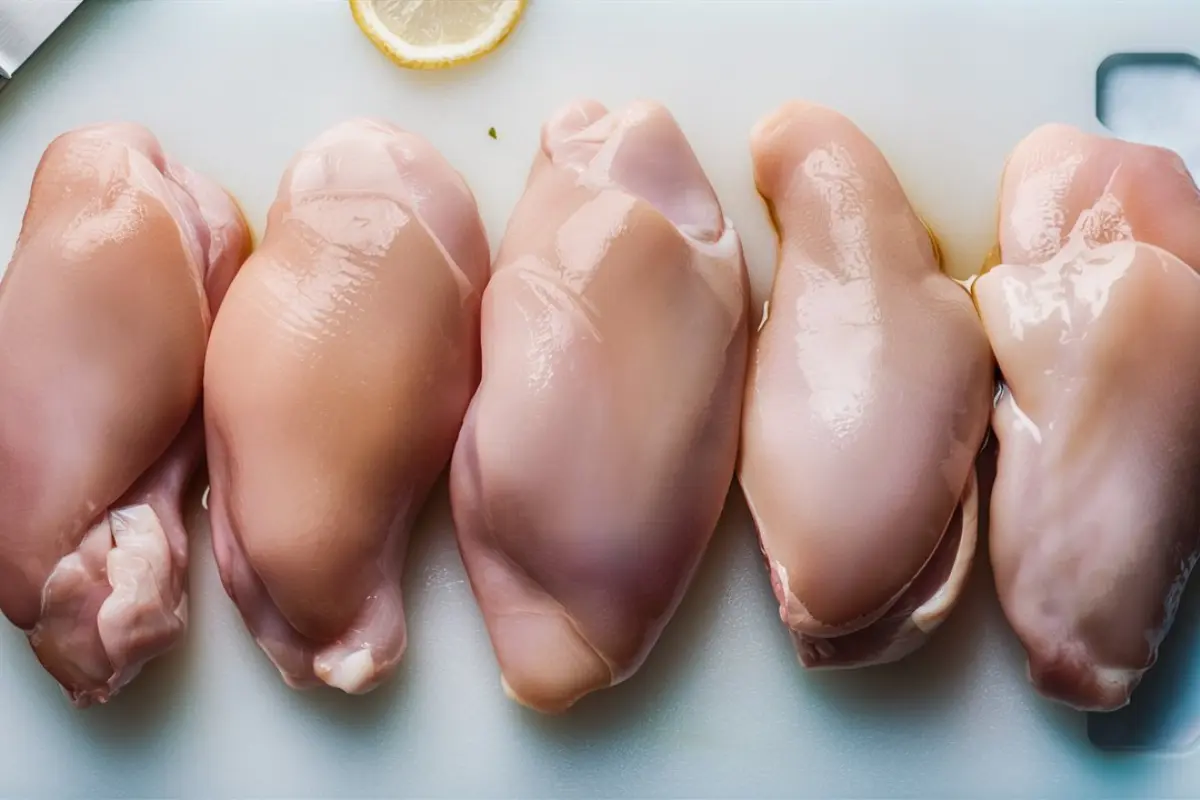
The Key to Success: Selecting the Perfect Chicken
The foundation of any great chicken cutlet recipe starts with choosing the right cut of chicken. Here, we’ll explore two popular options, each offering unique advantages:
Boneless, Skinless Chicken Breasts (classic choice, versatile cut)
These are the go-to choice for many home cooks. Boneless, skinless chicken breasts are readily available, lean, and incredibly versatile. Their neutral flavor allows them to easily adapt to a variety of seasonings and sauces.
Pros:
- Lean protein source
- Easy to find and affordable
- Adaptable to various flavor profiles
Cons:
- Can become dry if overcooked
Tips: For best results, choose chicken breasts that are similar in thickness. This ensures even cooking throughout. If your breasts are uneven, you can gently pound them thinner (we’ll cover this technique in Part 3) to achieve a uniform thickness.
Chicken Thighs (flavorful option, moist cut)
Chicken thighs offer a richer flavor and tend to stay more moist than chicken breasts due to their higher fat content. This makes them a great option for those who prefer a more flavorful and juicy cutlet.
Pros:
- Naturally flavorful
- More forgiving to cook, less prone to drying out
Cons:
- Slightly higher fat content compared to chicken breasts
Tips: Chicken thighs can be a bit thicker than breasts. To achieve a similar cooking time, you can either butterfly them or pound them slightly thinner.
Prepping Your Chicken for Perfection
Now that you’ve chosen your perfect cut of chicken, it’s time to prepare it for its crispy transformation. This section will focus on two key techniques: pounding and butterflying.
The Art of Pounding Chicken Cutlets (pounding technique, even thickness)
Pounding chicken cutlets is an essential step to achieving even cooking and preventing dryness. Here’s how to do it like a pro:
- Gather your tools: You’ll need a meat mallet (or a rolling pin in a pinch) and some plastic wrap.
- Place the chicken between plastic wrap: This prevents splatters and keeps your workspace clean.
- Pound gently: Use the smooth side of your mallet and deliver even, controlled blows. Aim to achieve a uniform thickness of about ¼ inch. Be careful not to pound too hard, or you’ll tear the chicken.
Alternative: Butterflying Chicken Breasts (butterflying method, thin cutlets)
Butterflying is a technique for splitting a chicken breast horizontally, creating a thinner and more evenly sized piece. This is ideal if you’re using thicker chicken breasts or want to achieve quicker cooking times.
- Locate the seam: Look for the natural seam running down the center of the chicken breast.
- Slice carefully: Using a sharp knife, carefully slice the chicken breast horizontally, stopping just short of completely cutting it in half. You should end up with one large, open piece.
- Open it like a book: Gently unfold the butterflied chicken breast. Now you have a thinner piece of chicken ready for pounding or breading.
Tips: Don’t be afraid to ask your butcher to butterfly chicken breasts for you at the store if you’re new to this technique.
The Ultimate Breading Station
Now comes the fun part: creating the flavorful coating that will transform your chicken cutlets into crispy masterpieces! This section will guide you through setting up your breading station and exploring different options to customize your cutlets.
Creating a Flavorful Breading Assembly Line (breading station, coating options)
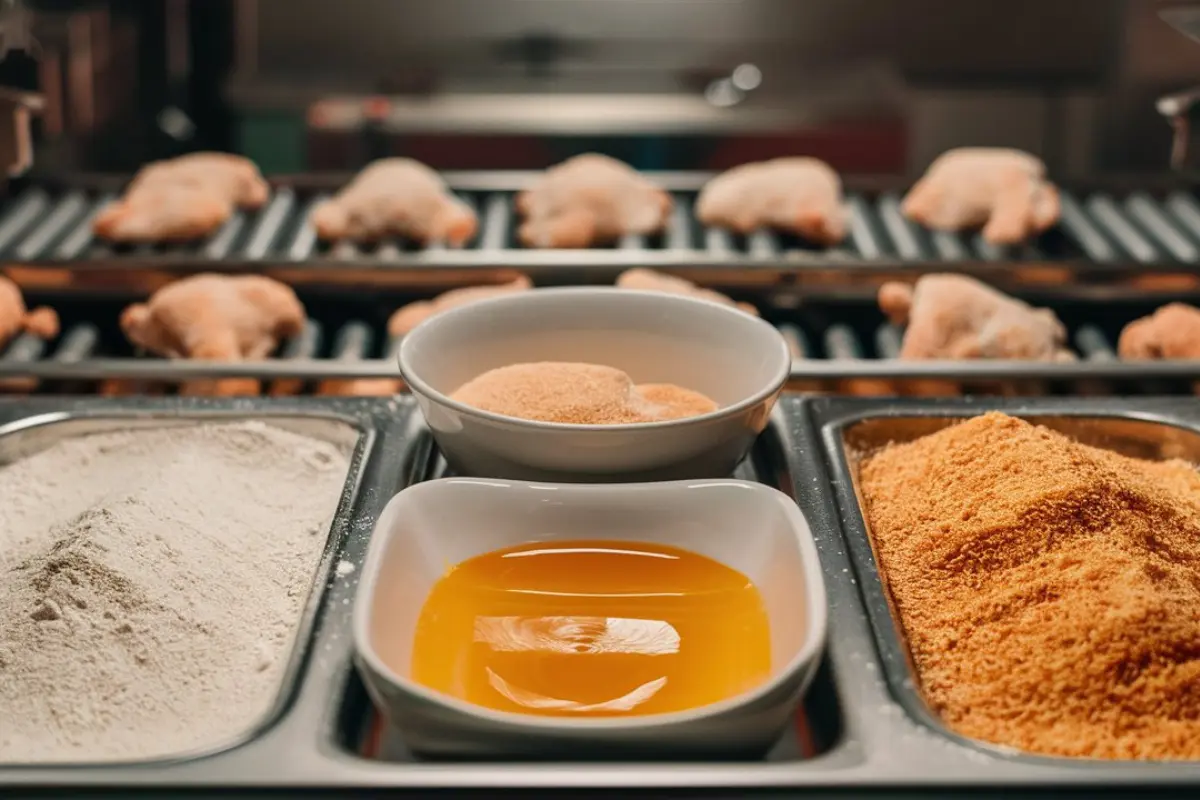
Imagine a production line dedicated to creating crispy perfection. That’s essentially what your breading station will be! To ensure a smooth process, gather your ingredients and arrange them in shallow dishes in this order:
- Flour: This forms the base layer and helps the egg wash adhere. Season your flour with salt, pepper, or even your favorite herbs for added flavor.
- Egg Wash: Whisk together eggs with a splash of water or milk to create a thin, even consistency. This acts as an adhesive between the flour and the breadcrumbs.
- Breadcrumbs: Here’s where the magic of crispy texture happens! You have several options to choose from:
- Classic Breadcrumbs: These all-purpose breadcrumbs offer a reliable crunch.
- Panko Breadcrumbs: Made from crustless white bread, panko crumbs deliver a lighter and airier texture with superior crispness.
- Crushed Crackers: Get creative! Experiment with crushing different types of crackers for unique flavor profiles.
Flour Power! (all-purpose flour, seasoned flour variations)
While all-purpose flour is the standard base for your breading station, don’t be afraid to add some personality! Explore these seasoned flour variations:
- Italian Seasoning: A classic blend of herbs like oregano, basil, and thyme, offering a touch of Italian flair.
- Paprika: For a hint of smokiness and warmth.
- Garlic Powder: Aromatic and savory, perfect for those who love a garlicky kick.
Beyond the Basics: Breadcrumb Options (breadcrumbs, panko breadcrumbs, crushed crackers)
Now, let’s delve into the world of breadcrumbs! Each option offers unique textural qualities:
- Classic Breadcrumbs: These provide a reliable crunch and are readily available.
- Panko Breadcrumbs: Made from Japanese white bread without the crust, panko breadcrumbs boast a lighter and airier texture with superior crispness. They’re perfect for achieving that golden-brown, restaurant-style crust.
- Crushed Crackers: Get creative and explore different types of crackers for exciting flavor twists. Crushed Ritz crackers add a buttery touch, while seasoned breadcrumbs like panko with herbs or spices can elevate your cutlets to a whole new level.
Elevate Your Breading with Cheese and Herbs (cheese, herbs, parmesan cheese, Italian parsley)
For an extra layer of flavor and sophistication, consider incorporating grated cheese and fresh herbs into your breading station. Here are some ideas:
- Parmesan Crusted Chicken Cutlets: Grated Parmesan cheese adds a salty and nutty depth of flavor.
- Lemon Herb Chicken Cutlets: Finely chopped fresh herbs like parsley or thyme paired with a touch of lemon zest create a bright and refreshing flavor profile.
Tips: For optimal adherence, dredge your chicken through each station twice. First, coat it lightly in flour, then dip it in the egg wash, letting any excess drip off. Finally, coat it generously in your chosen breadcrumbs, pressing gently to ensure good adhesion.
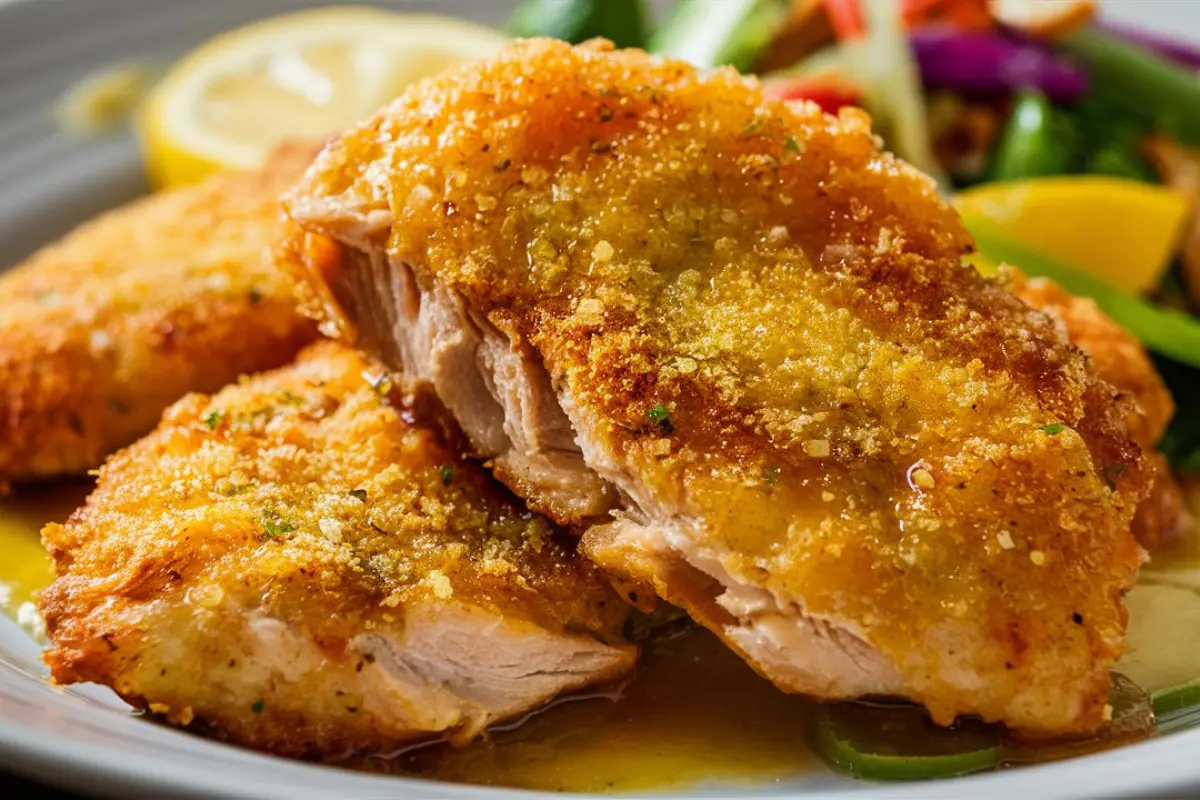
Unlocking Flavor Variations for Your Crispy Chicken Cutlets
Now that your chicken cutlets are beautifully breaded, it’s time to unlock the secrets of achieving crispy perfection! This section will explore two popular cooking methods: pan-frying and baking.
Pan-Frying for a Golden Sear (pan-frying technique, oil selection)
Pan-frying offers a quick and flavorful way to cook your chicken cutlets. Here’s how to achieve a delicious golden sear:
- Heat the oil: Choose an oil with a high smoke point, such as canola or vegetable oil. Heat it over medium heat in a large skillet or pan. You want the oil to be hot but not smoking.
- Test the oil temperature: To ensure the oil is hot enough, flick a few drops of water into the pan. If they sizzle and pop immediately, the oil is ready.
- Cook the cutlets: Carefully add your breaded chicken cutlets to the hot oil, avoiding overcrowding the pan. Cook for 2-3 minutes per side, or until golden brown and cooked through.
Tips for Avoiding Oil Splatter (oil splatter, safety tips, patting dry)
Pan-frying can sometimes lead to oil splatter. Here are some tips for a safer and mess-free experience:
- Pat your chicken dry: Excess moisture on the chicken can cause the oil to splatter. Use paper towels to pat your breaded cutlets dry before adding them to the pan.
- Use a splatter guard: This handy tool helps shield you and your kitchen from oil splatter.
Baking for a Healthier Option (baking method, healthy alternative)
Baking offers a healthier alternative to pan-frying, resulting in juicy and flavorful chicken cutlets. Here’s how to achieve crispy perfection in the oven:
- Preheat your oven: Aim for a preheated oven temperature of 400°F (200°C). This ensures the chicken cooks through quickly and maintains its crispness.
- Prepare your baking sheet: Line a baking sheet with parchment paper for easy cleanup and to prevent sticking.
- Lightly grease the chicken: Brush or spray your breaded chicken cutlets with a thin layer of oil to promote crispness.
- Bake the cutlets: Arrange the cutlets on the prepared baking sheet in a single layer and bake for 15-20 minutes, or until golden brown and cooked through.
Achieving Crispness in the Oven (oven-baked tips, crispy results, preheating oven, baking sheet)
While baking is a healthier option, achieving the same level of crispness as pan-frying can be a concern. Here are some tips for oven-baked crispy chicken cutlets:
- Preheat the oven properly: A preheated oven ensures the chicken sears quickly upon entering, promoting crispness.
- Use a baking sheet: Baking sheets distribute heat more evenly compared to baking dishes, leading to a crispier result.
- Consider convection setting: If your oven has a convection setting, use it! This setting circulates hot air more efficiently, promoting crispier results.
Remember: The exact cooking times for both pan-frying and baking will vary depending on the thickness of your chicken cutlets. It’s always best to use a food thermometer to ensure your chicken reaches a safe internal temperature of 165°F (74°C) for cooked chicken.
Don’t Overcook! Perfect Timing and Temperature
Achieving juicy and flavorful chicken cutlets hinges on perfect timing and internal temperature. Here’s how to avoid overcooked dryness and ensure your cutlets are cooked to delicious perfection:
Cooking to Perfection: Internal Temperature and Timing (internal temperature, cooking time, food thermometer)
Ditch the guesswork and rely on a trusty food thermometer for the most accurate results. This handy tool takes the mystery out of cooking and guarantees safe internal temperatures.
The Safe Internal Temperature for Cooked Chicken (safe internal temperature, 165°F)
Remember, aiming for the right internal temperature is crucial for both safety and deliciousness. Always cook your chicken cutlets to an internal temperature of 165°F (74°C) as measured by a food thermometer inserted into the thickest part of the chicken, not touching the bone.
Estimated Cooking Times: A Guide (cook time variations, thin vs. thick cutlets)
While using a food thermometer is essential, here’s a general timeframe to give you an idea of cooking times:
- Pan-frying: Thin cutlets (around ¼ inch thick) will cook in roughly 2-3 minutes per side. Thicker cutlets (around ½ inch thick) may require 4-5 minutes per side.
- Baking: For preheated ovens at 400°F (200°C), thin cutlets will bake in about 15-20 minutes, while thicker cutlets might take 20-25 minutes.
Remember, these are just estimates. The actual cooking time can vary depending on the thickness of your cutlets, the heat of your pan, and even your oven’s specific quirks. Therefore, using a food thermometer is the most reliable way to ensure perfectly cooked, juicy chicken cutlets.
Level Up Your Chicken Cutlets: Flavorful Variations
Now that you’ve mastered the crispy foundation, let’s explore a world of flavor variations to take your chicken cutlets from ordinary to extraordinary! We’ll delve into international inspirations, explore options for those who love a spicy kick, and even introduce you to an Asian-inspired classic.
Parmesan Crusted Chicken Cutlets for a Touch of Class (international flavors, recipe inspiration)
Travel the world through your taste buds with these globally inspired chicken cutlet variations:
Recipe: Parmesan Crusted Chicken Cutlets (Italian)
For a touch of Italian elegance, try these Parmesan Crusted Chicken Cutlets. The salty and nutty Parmesan cheese adds a delightful depth of flavor, while the crisp panko breadcrumbs ensure a satisfying crunch.
Ingredients:
- 4 boneless, skinless chicken breasts
- Salt and freshly ground black pepper
- All-purpose flour
- 2 large eggs, beaten
- 1 cup panko breadcrumbs
- ½ cup grated Parmesan cheese
- 1 tablespoon dried oregano
- ½ teaspoon garlic powder
- Olive oil (for cooking)
Instructions:
- Prepare your chicken cutlets by pounding them to a thickness of ¼ inch. Season them generously with salt and pepper.
- Set up your breading station with three shallow dishes: flour seasoned with salt and pepper, beaten eggs, and a mixture of panko breadcrumbs, Parmesan cheese, oregano, and garlic powder.
- Dredge each chicken cutlet in the flour, then dip it in the egg wash, letting any excess drip off. Finally, coat it generously in the panko breadcrumb mixture, pressing gently to ensure good adhesion.
- Heat olive oil in a large skillet over medium heat. Once hot, add the breaded chicken cutlets and cook for 3-4 minutes per side, or until golden brown and cooked through.
- Serve your Parmesan Crusted Chicken Cutlets hot with your favorite pasta dish or a simple side salad.
Spicy Kick: Cajun Chicken Cutlets (spicy flavors, Cajun seasoning, cayenne pepper)
Craving a taste of the bayou? These Cajun Chicken Cutlets will tantalize your taste buds with their fiery kick.
Ingredients:
- 4 boneless, skinless chicken breasts
- Salt and freshly ground black pepper
- 2 tablespoons Cajun seasoning
- All-purpose flour
- 2 large eggs, beaten
- 1 ½ cups panko breadcrumbs
- Vegetable oil (for cooking)
Instructions:
- Prepare your chicken cutlets by pounding them to a thickness of ¼ inch. Season them generously with salt and pepper.
- Dredge each chicken cutlet in the Cajun seasoning, coating it evenly.
- Set up your breading station with three shallow dishes: seasoned flour, beaten eggs, and panko breadcrumbs. Dredge each seasoned chicken cutlet through the flour, egg wash, and finally the panko breadcrumbs, ensuring good adhesion.
- Heat vegetable oil in a large skillet over medium heat. Once hot, add the breaded chicken cutlets and cook for 3-4 minutes per side, or until golden brown and cooked through.
- Serve your Cajun Chicken Cutlets hot with a cool and creamy dipping sauce, such as ranch dressing or remoulade, to help balance the heat.
Asian-Inspired: Chicken Katsu (Asian flavors, panko breadcrumbs, tonkatsu sauce)
Looking for a taste of the Orient? Chicken Katsu is a Japanese classic featuring a crispy panko crust and a delicious savory sauce.
Ingredients:
- 4 boneless, skinless chicken breasts
- Salt and freshly ground black pepper
- All-purpose flour
- 2 large eggs, beaten
- 2 cups panko breadcrumbs
- Vegetable oil (for cooking)
- Tonkatsu sauce (store-bought or homemade)
Instructions:
- Prepare your chicken cutlets by pounding them to a thickness of ½ inch. Season them generously with salt and pepper.
- Set up your breading station with three shallow dishes: flour, beaten eggs, and panko breadcrumbs. Dredge each chicken cutlet through the flour, egg wash, and finally the panko breadcrumbs, ensuring good adhesion.
- Heat vegetable oil in a large pot or Dutch oven to 350°F (175°C). Carefully add the breaded chicken cutlets and cook for 4-5 minutes per side, or until golden brown and cooked through.
- Drain the chicken cutlets on paper towels and slice them into thick pieces. Serve hot with tonkatsu sauce for dipping.
Remember, these are just a few ideas to get you started! Experiment
The Perfect Plate: Serving Ideas and Accompaniments
Now that you’ve mastered the art of crispy and flavorful chicken cutlets, it’s time to elevate your presentation and create a restaurant-worthy dish!
Plating with Panache (creative presentation, plating techniques)
Presentation is key! Here are some ideas to transform your chicken cutlets from delicious to visually stunning:
- Nestle your cutlets on a bed of colorful roasted vegetables like broccoli, carrots, and bell peppers for a vibrant and healthy plate.
- Arrange your cutlets on a bed of creamy mashed potatoes for a comforting and classic combination.
- For a lighter option, serve your cutlets over a bed of fresh greens with a light vinaigrette dressing.
- Garnish is your friend! A squeeze of fresh lemon juice adds a touch of brightness, while a sprinkle of chopped fresh parsley or herbs offers a pop of color and freshness.
Side Dish Symphony (side dishes, complementary flavors)
The perfect side dish can elevate your chicken cutlet experience. Here are some delicious options to consider:
- Mashed Potatoes: This classic comfort food pairs beautifully with the savory flavors of the chicken cutlets. Consider adding roasted garlic or herbs for an extra flavor boost.
- Roasted Vegetables: Toss your favorite seasonal vegetables with olive oil, herbs, and spices for a healthy and colorful side dish.
- Pasta Salad: A light and refreshing pasta salad with a simple vinaigrette dressing complements the richness of the chicken cutlets.
- Rice Pilaf: Add a touch of elegance with a flavorful rice pilaf seasoned with saffron or turmeric.
Remember, the possibilities are endless! Experiment with different flavor profiles and textures to create a side dish that perfectly complements your chosen chicken cutlet variation.
FAQs: Chicken Cutlet Conundrums Conquered
Even the most seasoned cooks encounter occasional kitchen hiccups. Fear not! This FAQ section tackles some of the most common chicken cutlet questions to ensure you achieve crispy perfection every time.
SOS! My Chicken Cutlets Are Dry! (troubleshooting dry chicken, preventing dryness, marinating)
Disappointed with dry chicken cutlets? Don’t fret! Here are some solutions to prevent dryness in the future:
- Embrace the marinade: Marinating helps tenderize and infuse flavor into your chicken. Try marinating your cutlets in a mixture of olive oil, lemon juice, herbs, and spices for at least 30 minutes before cooking.
- Brining (optional): Brining involves soaking your chicken in a saltwater solution for a longer period (around 1-2 hours). This helps retain moisture and results in even juicier cutlets.
Can I Give Leftover Chicken Cutlets a Second Life? (leftover cutlets, repurposing ideas)
Absolutely! Leftover chicken cutlets are a culinary goldmine for creating delicious new dishes. Here are some creative ways to breathe new life into them:
- Salads Sensational: Thinly sliced chicken cutlets add protein and flavor to your favorite salads.
- Sandwich Savvy: Elevate your lunch game with leftover chicken cutlets nestled in toasted bread with your favorite toppings.
- Chicken Pot Pie Perfection: Dice up your leftover chicken and incorporate it into a creamy chicken pot pie for a comforting and hearty meal.
The possibilities are endless! With a little creativity, leftover chicken cutlets can be transformed into exciting new dishes that your family will love.
The Perfect Chicken Cutlet Awaits: Unleash Your Inner Chef
Congratulations! You’ve embarked on a journey to crispy chicken cutlet mastery. This guide has equipped you with the knowledge and techniques to create restaurant-worthy cutlets at home.
From selecting the perfect chicken to achieving that golden-brown crunch, you’ve explored various methods and flavor variations. Now it’s time to unleash your creativity!
Experiment with different breading combinations, explore exciting spices and sauces, and don’t be afraid to personalize the recipe to suit your taste. With newfound confidence and a sprinkle of culinary magic, you’ll be whipping up delicious and delightful chicken cutlets that will leave your family and friends begging for more. So grab your aprons, fire up the stove, and get ready to conquer the art of the perfect chicken cutlet!